Capture your scene as a cubemap in Unreal!
If you recently got a HTC Vive, or you are familiar with software such as Virtual Desktop, then there's a chance you've viewed tons of cubemaps within VR. And if you haven't had the chance to try VR yet (you're missing out :/) you've most definitely played a 3d game where the sky consists of 6 textures, that together forms a cubemap. We place the cubemap on a sphere with inverted normals and we have atmosphere! Or no atmosphere, and you're dead. Is this real life?
It's usually called a skysphere, and if you're using Unreal (which you should) you've seen it in the default level.
If you don't know how to make a sphere with inverted normals, you can just check the "two sided material" checkbox in the material editor, and the textures will be displayed on both sides of your mesh.
Creating cubemaps can be a little bit tricky, especially to get the textures to align properly for unreals cubemap coordinates. This workflow does not replace the fact that if you want to make a big pretty sky filled with stars, you still need to get the texture(s) from somewhere. If you're specifically creating a star filled sky I recommend spacescape, it's magic.
BUT if you want to create a nice background for your SteamVR users or possibly recreate Valves level swap mechanic this is totally the way to go:
1. Place a Scene Capture Cube in your level

2. Right click in the content browser and create a Cube Render Target.

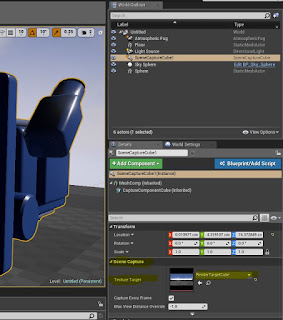
3. Select your Scene Capture Cube in your level, and apply this newly created asset as your scene capture texture target, in the details panel.
If you move around the Scene Capture you can now see the the texture change in realtime (as long as "Capture every frame" is checked).
4. Right click the RenderTargetCube asset that you applied as the texture target, and click Create Static Texture.
You have now taken a 360 capture of your scene and the texture is done! But we need to create a material that can display your texture properly.
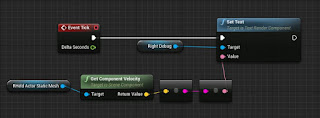
 5. Create a Material, and import the texture. Add and hook up the nodes like this:
The yellow node is a Constant3Vector, make sure you set channel B to -1, and the Two Sided checkbox to true.
6. Apply the newly created material to a basic sphere, and voila! The scene you captured is now displayed on, and inside the sphere.
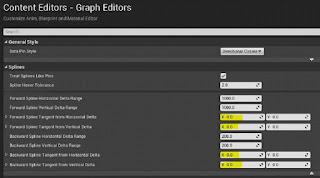
 It might be a good idea to change the capture resolution to something higher than default, you can do that inside the CubeRenderTarget asset we first created:
You need to recapture the scene by repeating step 4, and then import the new texture to your material to get the higher res image.
If you want to display the captured image in realtime at runtime, you just need to swap out the static texture you created in your material with the RenderTargetCube we created in step 2.
I hope this was useful to you! The biggest problem I had was figuring out the transform matrix for the material, and I wish to relieve you of such a headache.
In a later tutorial I will show you how to upload it to SteamVR workshop so that anyone who has a Vive or Oculus can set it as their background.
It's usually called a skysphere, and if you're using Unreal (which you should) you've seen it in the default level.
If you don't know how to make a sphere with inverted normals, you can just check the "two sided material" checkbox in the material editor, and the textures will be displayed on both sides of your mesh.
Creating cubemaps can be a little bit tricky, especially to get the textures to align properly for unreals cubemap coordinates. This workflow does not replace the fact that if you want to make a big pretty sky filled with stars, you still need to get the texture(s) from somewhere. If you're specifically creating a star filled sky I recommend spacescape, it's magic.
BUT if you want to create a nice background for your SteamVR users or possibly recreate Valves level swap mechanic this is totally the way to go:
1. Place a Scene Capture Cube in your level

2. Right click in the content browser and create a Cube Render Target.


3. Select your Scene Capture Cube in your level, and apply this newly created asset as your scene capture texture target, in the details panel.
If you move around the Scene Capture you can now see the the texture change in realtime (as long as "Capture every frame" is checked).
4. Right click the RenderTargetCube asset that you applied as the texture target, and click Create Static Texture.

You have now taken a 360 capture of your scene and the texture is done! But we need to create a material that can display your texture properly.
 5. Create a Material, and import the texture. Add and hook up the nodes like this:
The yellow node is a Constant3Vector, make sure you set channel B to -1, and the Two Sided checkbox to true.
6. Apply the newly created material to a basic sphere, and voila! The scene you captured is now displayed on, and inside the sphere.
 It might be a good idea to change the capture resolution to something higher than default, you can do that inside the CubeRenderTarget asset we first created:
You need to recapture the scene by repeating step 4, and then import the new texture to your material to get the higher res image.
If you want to display the captured image in realtime at runtime, you just need to swap out the static texture you created in your material with the RenderTargetCube we created in step 2.
I hope this was useful to you! The biggest problem I had was figuring out the transform matrix for the material, and I wish to relieve you of such a headache.
In a later tutorial I will show you how to upload it to SteamVR workshop so that anyone who has a Vive or Oculus can set it as their background.
Nice solution! Any idea on how to do this at runtime? I would love to capture key moments of gameplay and display them as VR wallpaper.
ReplyDeleteUse the rendertarget Image directly?
Deleteawesome thank you!
ReplyDeleteYour material nodes network isn't totally correct. Simply use the ReflectionVector node that you connect to the Uvs input of the Texture Sample.
ReplyDelete